Hello there and Welcome. I have had such fun experimenting with the New IndigoBlu Acrylic Pouring Alchemy set and then making samples for Kay Halliwell-sutton's shows on Hochanda I thought I would share with you some of the things I have done.
This is only the tip of the Iceberg so to speak and I'm learning something new every time I do a pour.
So let me share a few of the things I have found out so far.
One of the biggest things about this kit, is that it makes it really easy for you to create some outstanding pours. The difficult part has been done for you by Kay, adding all the right ingredients together in the bottle of Go-Flow to use along side the IndigoBlu paints, but more about the kit in tomorrows blog post.
Today I will share a few details of the samples I made for the shows.
I haven't put the full details of colours etc that I have used in each pour, but the one thing I have done in each of the techniques is to follow the recipe of 1tsp of paint to 2tsp of Go-Flow for each colour. ( At this time I didn't use the New colours that come with the kit as they weren't available)!
A few drops of water were needed in some of the colours, some more than others, to keep the consistency right for pouring. Think single cream!
Once this was well stirred and I was ready to do a pour I added 3 drops of Cell-U-Like to a couple of colours. You don't need to add it to the white. (Just as an extra bit of info, the white paint always seems to sinks and by putting Cell-U-Like into the colours they will push their way up through white especially when you do a swipe).
I also used my blow torch before tilting the substrates to get rid of air bubbles and to see if more cells would emerge.
This pour was done on a canvas using a Dirty Pour, Flip Cup. This means that the paint colours and Go-Flow were mixed up, adding a little water, then a little of each colour was poured into a new cup in layers with white paint. The cup was then flipped up onto the canvas, left for a few minutes to settle and then lifted up so the paint flows out over the canvas. The canvas is then gently tilted to help the paint flow over and cover the canvas.
This was another Dirty Pour Flip Cup using the paint mixture without adding water.
This pour was done using a different method. I used texture paste through a stencil onto the canvas and when dry, painted over the whole surface with white Gee-Soo-Good.
I mixed up enough paint to fill one of the larger cups in the kit. I layered the blues, purple and white into the cup then poured half of it over the middle of the canvas. I then tilted the canvas until the paint went over the sides of the canvas. Using a paint brush I then brushed away the paint from the words. Some white paint mixture was then poured over the middle of the words and brushed to the sides of the text. I did this several times to make sure the words could be seen clearly. I left this to settle for 10 minutes then went back and used the rest of the colour paint to create a boarder. This was left to dry for 2 days because of the thickness of the paint. I then gently went over the words with a blue StaZon Ink and pick out a couple of words in white. I then used a spray varnish to seal the canvas.

This canvas was done, blowing through a straw. White paint mixture was spread over the canvas then puddles of colours were poured across the middle, layer a couple of colours in each puddle. First blowing the colours out from the middle to one side of the canvas then changing round so the colours are blown out on the other side. I added more puddles and repeated the steps above.
This canvas was a Four cup Dirty Pour, Flip Cup. The paint was mixed up and poured in layers into 4 cups. These were then flipped onto the canvas. White paint mixture was then poured around the cups. Once the white had settled each of the cups were lifted to release the paint. The canvas was tilted until the paint covered the canvas and sides.
This was a Dirty Cup poured onto one end of the canvas then tilted until the paint covered all the surface. Once dry the word Believe was stencilled using texture paste.
Technique- Dirty Pour, Flip Cup
So for this pour I prepared a cup with lots of white and yellow paint with small amounts of blue and red.
I stirred the paint in the cup twice, just enough to break up the white and yellow, then flipped the cup onto the canvas. I let it settle, tourched it to pop any bubbles and to see if I could get more cell's which I did.
I love the colours that came up in this one.
Technique – Using
Luscious Powders
Mix the LP with a little water to get a creamy paste. Add
Go-Flow and mix. Do this to 5 colours. Add the Cell-U-like
Create 4 Dirty cups
Cover the board in white paint and flip the cups onto the
board using a piece of thick plastic.
Lift cups up and let the Luscious flow. Tip the board until
its all covered. Then sprinkle Unicorn Sparkles around the edges and in some of the white veins.
Technique – Christmas Decorations
First prime the plastic or glass bauble with gesso
Mix up 3 colours of paint as normal but don’t add water.
Pour colours into a paper cup and form a spout for the paint
to pour from. You have more control doing this.
Hang the bauble, then slowly cover with paint from the top
letting it slide down and cover the surface. Leave to dry for a few days.
Decorate and tie on a ribbon
 Technique – Door
Hanger
Technique – Door
Hanger
Cover up one side of the door hanger with masking tape.
Paint the other side with gesso. Once this is dry create a
pour on one side of the door hanger.
Let it dry, then varnish.
Remove masking tape then paint with gesso, then once dry
paint with colour.
Decorate the front. I used a small clay face which I had
done a pour over.
Wet Pour (Just done)
Technique – Pouring over a small bowl
Using Metallic Paints
Create a small dirty pour in the small bowl and flip into
the centre of the cake board
Fill up a large cup with several different colours
Slowly start pour in circles over the top of the bowl. Keep
going until you run out of paint
Wait a few minutes for the paint to level out then lift the
bowl up. Tilt until the surface of the board is covered.
In hindsight I shouldn't have just used metallic paints.
Dried Pour (This size took 3 days to dry out)
I found that by using all metallic paints I didn't get any cells and when the pour had dried, the colours had merged together.
Varnishing the board brought some of the colours out a little.
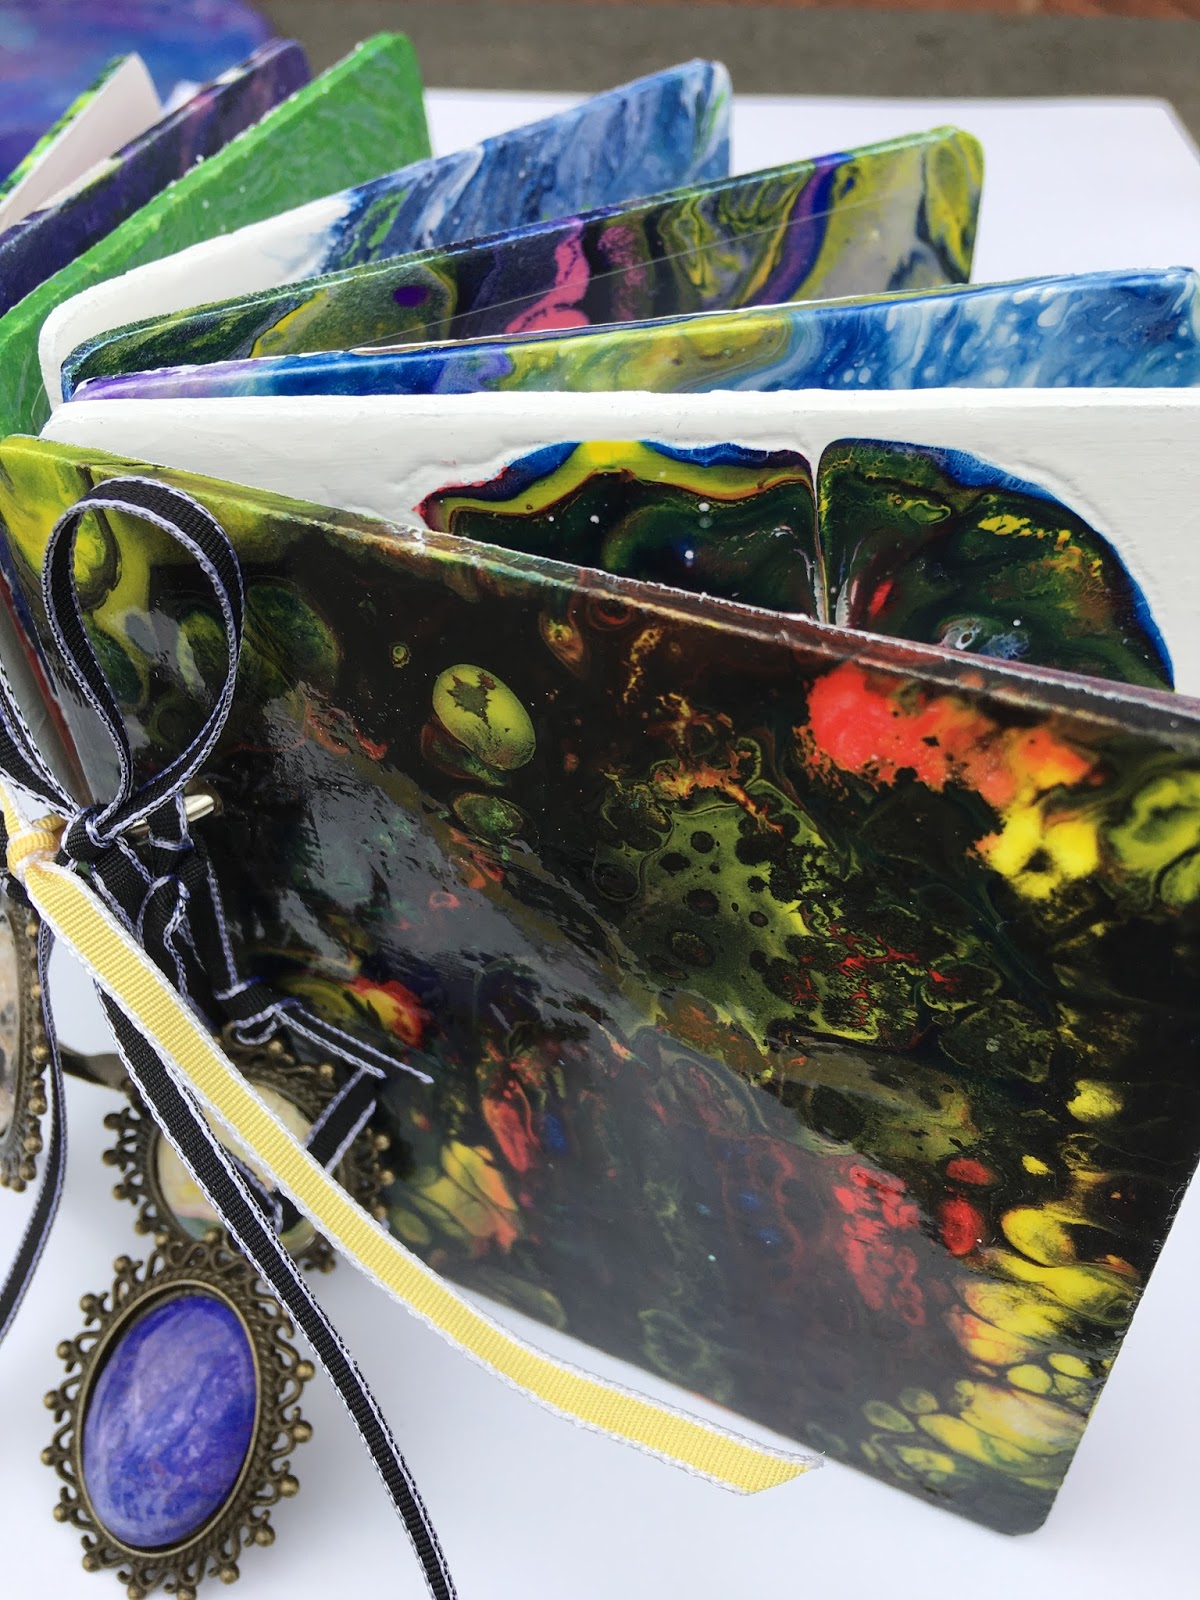
This is the little Technique book shown on Hochanda. I used the brown boards from the kit. Before I did any paint pouring on them, I painted both sides with Gee-Soo-Good.
The charms attached to the book were made from the skins left at the bottom of the tray after pours were done.
These skins can be used for lots of art projects so don't throw them away.
Technique - Swipe
Mix up 3 colours of paint and some black Gee-Soo-Good.
Pour strips of paint colours onto the board. Pour a thick strip of black paint one end of the board and using a piece of plastic packaging swipe the black paint over the colours. Watch the coloured cells appear.
Once dry I covered the pour with Liquid Glass.
Technique – Dirty pour using Luscious powders onto Dura-Lar
This is a great surface to pour onto as it won’t curl or
wrinkle and once dry can be die cut shapes to use in card making etc.
Please note- You need to be patient as it takes
A long time to dry completely
Technique – Moving the paint by Blowing
Spread white paint over the board
Pool colours over each other in the middle of the board
Then blow the colours out towards the edges
Using the end of a paintbrush, pull the paint inwards to
define petals
Technique – Dirty Pour Flip Cup over white paint
Spread white paint over the board
Fill a cup with 3 different colours & white
Flip cups into the middle and life off
Tip board from one corner the other
Technique - 3 Dirty
Flip Cups
Create 3 small dirty cups using the same colours and flip
onto board in different positions.
Lift the cups and let the colours run into each other. Tilt the board until its covered in paint.
Technique - Cup Slide
Make up a small Dirty Cup of colours. Cover the board with white mixture. Flip the dirty cup onto one end of the board. Let the cup slide across the board. Then lift the cup and tilt the board backwards to cover where it had already slid.
Technique - Creating a textured Pour
Mix up several paint colours keeping the paint thick. Pour colours in layers into a small squeeze bottle. Starting in the middle of the board, squeeze the bottle and make small circle movements until the paint is used up. If needed tilt the board until covered with the paint.
Technique - Straw Blowing
Paint over surface with white paint mixture
Pool layers of colours across the middle of the board
Blow out the colours using a Straw from both directions
Technique-Three cup Dirty pour onto Acetate
This is a great surface to pour onto as it won’t curl or
wrinkle and once dry can be die cut shapes to use in card making etc.
Please note- You need to be patient as it takes
A long time to dry completely
Technique - Dirty Cup Pour
Layer 3 colours into a cup, for this I used two blues and a yellow, plus a little white.(As you can see in the photo I had some green appear).
Don't flip the cup just pour the colours on the board and tilt until covered.
I hope you enjoyed ready this rather long blog post and I hope it gives you some ideas on starting this addictive craft.
My main advice would be to 'just go for it'. Don't get hung up on doing things the right way, experiment and have fun!