Sunday 14 October 2018

Tie Dying and Stamping with IndigoBlu

Hello there, today I have a project to share with you using the IndigoBlu Artists Acrylic Paints, which are also Fabric paints and some of the Newish 'Artist' Stamp sets.
I wanted to try a little Tie Dying with the paints as well as stamping images on the T-Shirt.
Step 1. Using a pre-washed tee-shirt I decided to do some tie-dying using the Cottage Garden Acrylic paints which are also fabric paints. I mixed the following paints, Sleeping Beauty, Park Lane, Grandma’s Teacup & Kingfisher Blue up into separate plastic cups with a little water.

Step 2. Using some small glass pebbles I took one at a time and gathered up some of the tee-shirt material from just one side of the shirt and wrapped some rubber bands up and around the material to keep the pebble in place. I did the same thing all over the tee shirt including the arms.(Learning from my mistake, don’t wrap the rubber bands to tightly as the paint doesn’t spread so well and stretches the tee-shirt material)!


Step 3. I then dipped the material covered pebbles into different colour paints then went back to each part of the wrap and added different colours with a paint brush. Once done leave to dry out.


Step 4. Once completely dry, undo the rubber bands and take out the pebbles. Iron the T-Shirt to set the paints using some copy paper over the painted areas to protect your iron and board.


Step 5. Hand wash the T-shirt and dry. Then using Stazon Black Ink or you could use the Stroke of Midnight paint, stamp out images from “Artist Tools”, “Art gives you wings“ and “Art Studio” around the Tie-Dyed patterns. 

Step 6. Once dry, iron again to fix the stamped images.
Hand wash the T-Shirt the first time and after that you can machine wash it on a 40 degrees wash

Enjoy creating one of your own xx


Please check out the IndigoBlu Blog for more inspiration from the other TV Design Team members called the 'BluBirds'.


Happy Crafting,
Sue xx


Thursday 27 September 2018

Challenge Yourself With IndigoBlu- Master Board Technique

Hello everyone, have you missed me?
I have been busy with the family over the last couple of months with my daughters wedding and my other two moving away from home but now I'm back and to start off blogging again I have a tutorial to share with you on how to make up a batch of  cards creating a master board with paint as the background for cards. This blog post came about as an inspiration piece for the 'I Love IndigoBlu' unofficial fan page for the monthly challenges we run. This time the Theme is 'Christmas/ Winter and I'm going to make up a master board using shades of blue and the focus of the cards will one of the New Christmas Stamp A5 sets from IndigoBlu called Tree Dressing


Check out the 'I love IndigoBlu' Facebook page for details of the new 'Challenge yourself Event'. 
You of course don't have to make more than one card or project. My contribution was to give you some ideas xx
Kay and Alfie from IndigoBlu are very generous and give us fab prizes for the winner! Why not pop over and join in! 


IndigoBlu Items used
Stamp sets -Tree Dressing & Vintage Frame
Stencils -  Stars , Snow and Spirit of Christmas
English Cottage Artist Acrylic Paint - Sleeping Beauty, Purple Rain, Townhouse Teal and Snow White.
IB Watercolour card, Rice Paper and Super Thick Slap it On, Slap it on (matt), Unicorn Sparkles and Phat Foam (These items are all on the website)!
Water spray bottle, Spatula, White & coloured card, Card Blanks or make your own.

Whats next
Step 1. Using a spatula  put small dabs of paint onto your glass mat or a piece of plastic and spray with water. Carefully spread out the paint without mixing the colours together to much, spray again with water.
Lay the watercolour card down onto the paint and press. (There was enough paint left so I managed to use two pieces of card). Mop up any remaining paint with the rice paper. Leave the card and rice paper to dry or speed it up by using your heat tool.


2. Once the watercolour card is dry, use a piece of phat foam to add Sleeping Beauty paint through 'Star' stencil and then without cleaning the stencil use some of  the Snow White paint to create a pale blue colour through the stencil. Now fill in any gaps with the 'Snow' stencil and the Snow White paint. Spread some Purple Rain onto a piece of phat foam working it in to make a ink pad to use on the smaller circle frame from the Vintage Frame set and stamp across the master board. Use the side of a coffee stirrer or credit card to create lines of Town Teal across the MasterCard. Once dry cut up into different sizes and use to create a job lot of card fronts.

3. Onto the Rice Paper. I used the paint pad and circle frame stamp again and randomly stamped across the paper. Then using a dark blue ink I stamped 'Happy Holiday' from the Vintage Frame set in the centre of the round frames. Stars from the Tree Dressing set were stamped over the rice paper.

3.Now decide how you want to use the Master board. Here are some ideas from me. 

Stamping out images onto the master board panels or onto white card and cut out and colour.

Changing or highlighting some of the colours on the master board by using a weak solution of  bleach and water.

Using 'Super thick Slap it On' mixed with Paint and Unicorn Sparkles and using it through the word stencil.

Card 1.
Starting off with the Rice Paper, I cut off a piece that would cover a piece of 5 1/2" x  51/2" piece of card and used slap it on to stick it down and seal it. This was mounted onto a slightly bigger piece of black card then mounted onto a white card base. A square of the master board was matted onto black card and glued to the card front with a stamped sentiment from the Vintage frame set.

Card 2. 
Stamping straight onto a master board panel with the stockings and taking some of the colour out to highlight the stockings.Finish off the panel by sponging purple paint around the boarder. Using Thick Slap in on mixed with blue paint and Unicorn sparkles through the stencil. Mounted on green card then a card base.

Card 3. 
Stamping out the trees with green ink and using the same stencil and colour as above. The Reindeer and Stockings were stamped, cut out and coloured. These were then mounted on foam dots to give some dimension. The panel was finished off using some white puffy paint for snow dots and mounted as the card above.


Card 4.
Smaller panel of the master board was stamped with just the top of the tree. A Reindeer and string of lights were stamped, coloured and cut out. Mounted using the same technique as above.


Card 5.
Strings of lights were stamped and coloured at the top of a piece of white card then cut down to measure an 5"x8" card panel. A piece of the master board was cut into a panel of 4 1/2" by 2" and mounted onto green card and had "Christmas Wishes" stencilled across it with Super Thick Slap it on mixed with blue paint.This was then mounted onto black card and a white card base.

Card 6. 
Using my stamping platform I positioned the Reindeer to fit just to the right, bottom part of a 6"x6" piece of white card and inked up the stamp with black ink. Once the image was stamped  I glued in place a square of the master board into the centre of the white card. The Reindeer was still in place on the stamping platform and the image of the Reindeer lined up perfectly over the master board piece. I then stamped out stars and painted them in with a wash of purple and stamped a couple of the small stars out in green ink. Super thick slap it on was mixed with Unicorn sparkles and put through the stencil. The string of light bulbs were stamped out coloured and cut out. The card panel was then mounted onto green card and a card blank.

I still have more of the master board pieces left so I can make up some more cards in the same style as above.

These are my ideas and I hope it has given you some of your own and inspired you to start on your own cards and of course join in with the challenge. I look forwards to seeing what you create. 

Need some more inspiration then you really have to check out what Julie has created for this challenge.


Thank you for stopping by. Happy Crafting xx

Sunday 1 July 2018

IndigoBlu moving forwards into July!

Hello there and Welcome to the brand New month of July ahead of us.
As everyone in the UK will know, we have been experiencing something of a heatwave which is quite nice but I am longing for a little rain and a cooler breeze. Yes I know, never satisfied with the weather. I'm sure there a lot of people who won't agree with me but there you go.

Kay and Alfie had a busy last month travelling around with their Dirty Weekend plus a couple of Craft shows and everything else that needs to be done running IndigoBlu. As a special summer treat they have added a 20% Discount on the IndigoBlu web page and Free P&P running until midnight tonight (1July)!


July is set to be another busy month for them. 
As some of you may already know, Kay has produced a beautiful step by step project in the August 2018 Craft Stamper Magazine. I can't share the project here with you but you really must check it out by getting your hands on this amazing magazine, not only to see and read how Kay put her project together but its a great magazine filled with so much for those of you who enjoy Stamping or anything to do with mixed media.


Moving on from Kay's project have you seen the "Challenge Yourself Event" on the Face Book Group 'I Love IndigoBlu yet'! Until the 20th July we are inviting you to create a project using IndigoBlu products to depict 'Summer'. 


Its as easy as that and there will be a surprise price from Kay for the winner. We hope you do join in as we love seeing how you use the IndigoBlu products. Even if you don't have time to join in with this Event we still want to see what you have been making so please join in and share your work on the group.

Kay and Alfie will be back on the road travelling to Endinburgh for another of their Dirty Weekends on the 14th & 15th July. Although this workshop is fully booked you can still go and buy from the IndigoBlu Pop-Up-Shop.

If you would like to attend one of the IndigoBlu Dirty Weekends there are still some places available on the Maidstone (Sept 15th-16th) workshop
&
Exeter (Nov 17th & 18th) workshop

One last thing to mention before I go is the Next Hochanda Show with Kay.
This will be a One Day Special (ODS)
On Tuesday 17th July ( 6pm, 8pm) & Wednesday 18th July(9am, 1pm & 5pm) 
Myself and others in the TV design Team have had lots of fun creating samples for Kays show and I think you will be blown away with what Kay is bringing you. Not only are there New Stamp Sets but a lot, lot more. Sorry I can't say anymore, just that i'm really excited and have so enjoyed using these new items.

Thank you for stopping by and having a read. Have a brilliant July, I know I will.
Happy Crafting,
Sue xx

Friday 29 June 2018

Pull Up Greetings Card Photo Tutorial

Hello there, WARNING. PHOTO HEAVY BLOG POST - but I really hope you enjoy taking a look.
Today I have a card to share with you. Its an interactive type of card that I hadn't seen before and found it when I was on Youtube. Here is the link to the channel I first saw this type of card.
It caught my eye as its a bit different and which I love, yet folds up to be posted so doesn't cost too much to send. 
When making my sample up I did change some of the details as to what they did in the video.

I have kept with the name, Pull up Card but its also know as an Accordion or Lantern Card.
As I was quite taken with this card so used it in my FB challenge group and also for my monthly Craft group. The ladies all came up with some stunning cards.
Here are a few photos of the craft group in full card making mode!


Below are some photo instructions on how I made my first Pull Up Card and further down the post there are some other, slight variations. Enjoy.

 Cut yourself 1 base layer in plain card 6 1/4" x 6 1/4" and patterned paper layer a 6"x6"

 Cut 4 strips out of white card measuring 2" x 12" then score at 2", 4", 6", 8" and 10" mark
Fold all strips into a concertina


Using your trimmer cut up 
20 x 1-3/4" squares in the base colour card
16 x 1-1/2" squares in the patterned paper
4 x 1-1/2" squares in white card (These will be used for stamped sentiments)

Now to layer up those squares. Stamp your quotes onto the white card first then layer them up onto the base coloured card. Layer up all the rest of the base coloured squares with the patterned paper.

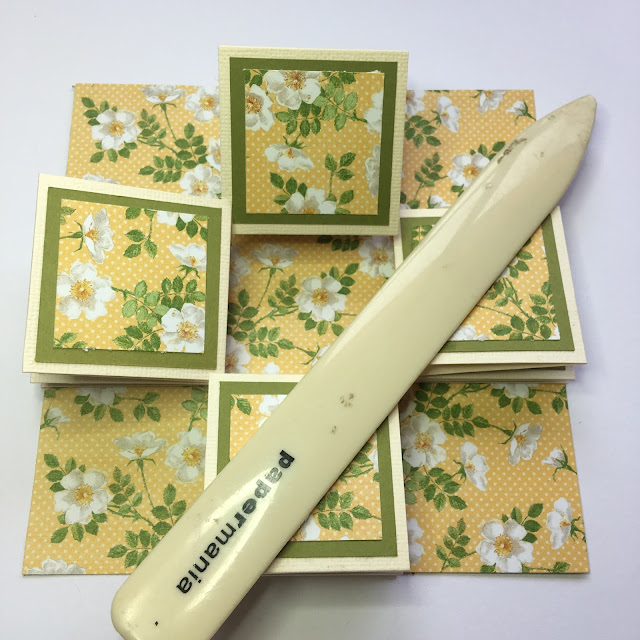
Attach all the squares to the 12" strips but leave the bottom squares as these are going to be attached to the base layer.
 I kept all my sentiments in line but you could add them anywhere you want.


Next step is to turn your patterned base layer over and draw to lines to show the layer in 1/4's. This will help you to position those 4 concertina strips.

I used one of the 12" strips as a template to mark where each strip should should be placed equally.

Now glue down each 12" strip making sure the patterned paper on the strip is showing.

Once all the 12" strips are glued down flip over and concertina the strips again. Use a bone folder to get crisp folds.

 Using the same coloured card, cut out 2 - 3 1/4 x 3/4 strips
Glue the strips together at the centre point of the strips

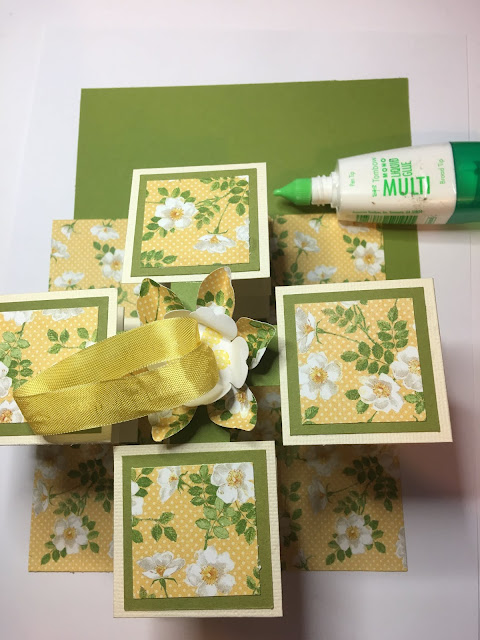
Punch a hole in the middle of the cross. This will be where the ribbon is threaded through later. Now lay the cross onto the middle of the patterned paper. I unfolded the strips and folded the strip back after the third square from the top. See photo above! This makes it easier to get the cross positioned correctly in the middle of the card
With a pencil,  mark on the cross where each top part of the strip meets then you know where to put the glue to attach it to the strips. Don't glue anything down yet!

Use punches or die's to cut out three shapes. The flowers are to embellish the top part of the cross and the circle is to hide where the ribbon comes through under the cross. (see photo below).

Layer up the flower and glue into the middle of the cross. Turn over and using the hole in the cross as a guide, punch a hole all the way through the flower as well.

Glue two parts of the cross to two of the 12" strips.
With a 8" piece of ribbon, doubled up, thread the ends through the flower and cross as the photo above.

 Separate and flatten out the ends of the ribbon and stick the ends onto the cross using strong double sided tape. Add some of the tape to the circle.

 Cover up the ribbon ends with the circle to tidy everything up.

Stick down the remaining strips into place.
Cut out a piece of white card measuring 6"x6" and glue onto your card base so that you can write a message.  
 Turn the pull up card over and run some glue along the base piece of patterend paper and stick the card base down into place. Flip the card upright and make sure everything lines up.

And that's it! You can also add other embellishments to further decorate the card as I have done in the other style of cards I made below, and going on a little further you could also make an envelope or box for the card to go in.
Here are a few extra cards I have been making. 
I would love to know what you think of these cards and if you have made one already.
Have fun and Happy Crafting.
Love Sue xx